What is Toenailing and How to Toenail Wood Properly
When you’re a newbie at working with wood for your DIY projects, you may have developed the habit of driving a nail straight down your workpiece.
By and large, that’s a good habit. But in some cases, you need to drive a nail at an angle into a piece of wood.
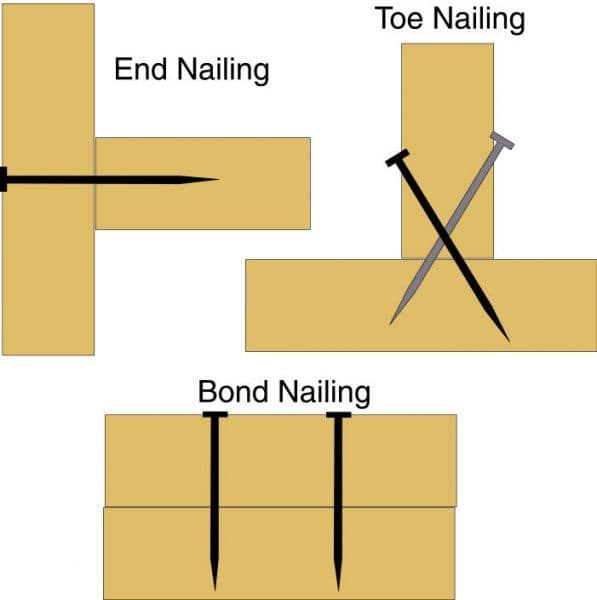
This is called toenailing. It’s actually skilled that every carpenter develops because you’re eventually going to need it.
One of the more obvious examples is when you have 2 planks and you want to join them to form some sort of inverted T.

One way to do that is with toenailing. You drive the nail at an angle (maybe 45 degrees) so that the nail goes through the standing wood piece and through the foundation piece at the bottom.
Generally, you use 2 nails so that you drive them down on each side of the top wood piece.
How Strong is the Toenailing Connection?
If the stars align and you do everything right, you’ll have a strong connection that won’t easily collapse. This strength will actually depend on a lot of factors, including the following:
- The quality (species, grade, condition) of the lumber
- The number of nails you use (which will depend on the size of the wood pieces)
- The length of the nails (as it should be long enough to penetrate both wood pieces)
- Low placement of the nails so that they penetrate the lower wood piece
- High placement of the nails so that you get enough purchase and you don’t split a little chip from the edge of the wood piece
- The angle you drive the nails
- The closeness of the nails to each other
Using a Hammer for Toenailing
Nowadays, you can get yourself a proper framing nailer that can do toenailing for you without too much of a fuss. But if don’t have one, don’t worry.
After all, the ancient carpenters have pretty much managed to do this with just a hammer.
Here are the steps you need to take:
- First, make sure you position the 2 pieces of wood properly. You may want to mark the pieces down so you know where they need to be placed. Once in place, you can use a foot at the back of the standing wood piece to keep it steady.
- Mark where you’re putting in the nails. Check the size of the nail on the sides of the wood pieces so that you can confirm that the nail will penetrate at least an inch inside the bottom nail.
- Now you can drive your nail in from the other side of the wood opposite your foot. You need to drive it in by about ¼ of an inch. You tap it in straight, and not at any downward angle.
- You can then pull the nail up so that the nail is at a 50-degree angle, more or less. At this point, you may want to give the nail a few taps of your hammer to make sure it’s securely in position.
- Now you can use the hammer to drive the nail in. Make sure you have a firm yet relaxed hold on the end of the handle. Swing the hammer from your elbow, with a bit of a wrist snap to be on the safe side.
- Adjust the swing as the nail comes close to being fully driven in. The swing should now be a bit slightly away from you so the face of your hammer hits the nail head somewhat off-center. To drive the toenail in completely, you need to use the edge of your hammer face to catch the head of the nail.
- Do these steps with the toenails on the other side.
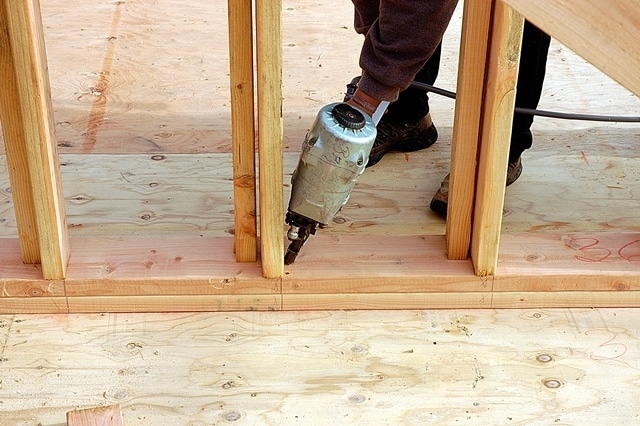
Using a Framing Nailer for Toenailing
This is a lot easier to do. You may have to fork a bit of money, but then again you may find it worth the cost when you’re not as frustrated and you get better results. Basically, the framing nailer can put in the nails in the angle you want with just one pull on the nailing gun trigger.
You may want to read up on the manual of your framing nailer, as it may contain specific instructions regarding toenailing with the nailer. Still, the steps should be similar to these steps we’ve listed here:
- Pick the right nails and load the framing nailer. Make sure the nails are the right type with the right length. Again, the nail should be able to penetrate at least an inch on the other board.
- Mark the position on the second board where you want the first board to be placed. You can then use your toes (wear tough shoes) to securely hold the first board in place.
- Aim the nailer at the spot where you want to drive the nail in. This should be about ¾ of an inch away from the corner where your 2 boards meet. It’s through this point that the nail will go through the first board to anchor itself diagonally on the second board.
- Set your nailer at an angle of about 50 degrees. This will give you the diagonal direction you need for your nail.
- Press the trigger softly, and fire the nailer.
That’s all there is to using a framing nailer. You won’t have to pull the nail or set it in gradually. You won’t have to practice swinging the hammer the right way. With the framing nailer, you basically just have to press the trigger once the boards are in place and you’ve found the right spots for your nails.
Picking the Right Framing Nailer
Here are the factors you need to consider:
- Size and weight. It should be comfortable to use.
- Power source. You may want to use an air compressor with your framing nailer. This gives you enough power, but then you need to deal with the hose and cords. Another option is using a cordless electric nailer, which gives you more mobility. But you have to make sure you get enough power to drive the nail in through your wood.
- Nail capacity. If you don’t want to reload too frequently, you’ll want the nailer to be able to load more nails in one go.
Additional Tips for Toenailing
Using the Right Number of Nails
If you use too few nails, the wood pieces may not be connected securely. But if you use too many, you’ll just end up fracturing the wood piece. You should check the nail schedules in the building code for your area if you’re working on the framing on your home.
Here are the general guidelines:
- For the bottom of a 2×4 stud, use 2 nails per side.
- For the bottom of a 2×6 stud, use at least 3 nails per side. However, in some cases, you may want to go with 4 nails per side.
- For a 2×6 joist, you may go with 4 nails per side.
Positioning the Wood Piece
You may want to set the nailed-through piece of wood about ¼ of an inch past the placement mark. This compensates for the movement that the wood usually does when you’re toenailing it.
Placing the Nails
As we’ve already mentioned, the spot for the nails should be at least ¾ of an inch away from the end of the wood piece. But it shouldn’t go more than 1¼ inches away.
Nail Size
It all depends on the boards you’re using. A bigger board will require longer nails.
To know more about nail size read this: A Complete Guide to Nail Sizes for Framing
Avoiding Splitting
You can’t go too low in your nail placement, or you’ll split the wood. You may also want to aim the nail across the wood grain. This means the nail will cut across the grain and you don’t get any splitting.
Learn 16 vs 18 Gauge Nailer: Which One To Get?
Conclusion
Always prioritize safety when you’re dealing with nails, and especially if dealing with framing nailers. Practice safety protocols, and it’s a good idea to wear safety goggles. You never know when a nail might ricochet to your face.
If you’re doing a lot of toenailing, you may find that a framing nailer solves all your problems. It’s true that you can do this with a hammer.
But this will take a lot more time and effort, and the results may not be as consistent. With a framing nailer, you eliminate much of the hassle.
But even with a framing nailer, it may still be a good idea that you practice. Do some research on how many nails you need for each situation, and on where you need to place your toenails.
Toenailing isn’t just something you do. It’s a skill you can develop, and you can be better at it with practice and experience. By doing it right, you can make sure your joined wood pieces will be strong enough for your needs.
