Best Flooring Nailer Reviews for Solid and Engineered Hardwood Floor
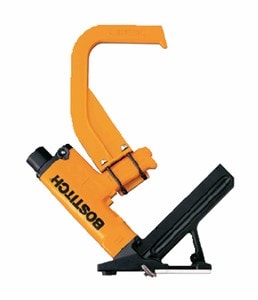
Also referred to as a floor nailer or the flooring cleat nailer, this tool is a large tool that dispenses cleats at a 45-degree angle. It’s a relatively large item that is somewhat V-shaped with a handle that extends upwards from one of the inner sides of the ‘V’. Its primary purpose is to help you drive in cleats into the wood and your floor.
Flooring nailers are not electric power guns, it still requires a bit more effort to use. Unlike drills and impact drivers, you’ll need to hit the driver head using a mallet in order to dispense a cleat into the wood. With the angle of the dispenser, this tool is capable of driving the cleat into the wood and floor at a 45-degree angle.
Learn more about some other types of nailing guns
- Palm Nailers Reviews
- 23 Gauge Pin Nailers Reviews
- Best Siding Nailers Reviews
- 8 Best Nailers for Fencing
Commonly confused with flooring staplers, flooring nail guns are definitely different. Flooring staplers provide two-pronged fastening which is stronger than what cleats can offer. However, they do not hold as firmly as cleats do when the woods start to expand or contract. As a result, they cause creaking and splitting.
Types of Flooring Nail Guns and Their Use
Flooring nail guns can be both power and manual tools depending on the type you’ll get. There are two general types of these items which we will discuss in detail below.
Pneumatic Flooring Nailer
As its name would suggest, pneumatic flooring nailers are air-powered tools that will let you use additional force produced by an air compressor to drive in the cleats into the wood and your floor.
Because of this, you need to plug it into an air source instead of an electrical socket. While this can also qualify this product as a power tool, it’s still important to note that you’ll still need to hit the ram or drive head when dispensing cleats into your floors.
Manual Nailer For Flooring
Manually operated flooring nailers, on the other hand, are not designed to be assisted with any additional force to drive in the cleats into the wood and your floor. While they do have springs, you don’t need to hook them up to anything before use.
This type only relies on the physical force you’ll provide when hitting its drive head in order to dispense its cleats and attach wood panels to your floor. When it comes to pricing, pneumatic flooring nailers are more expensive than manual ones. This might also help affect your decision making so it’s important to note.
Buying Guide for a Hardwood Flooring Nailer
As flooring nailers will play the main role in your wood floor installation, it’s just right that you want to know how you can find the best tool for you. In this case, we’ve rounded up some of the most important tips and points to consider to help you narrow down and weigh your options. Check them out below.
Decide What You Need
To help you narrow down the scale of your options, you should first decide exactly what you need in a hardwood floor nailer or flooring staples, if you actually need one at all. Since there are different types of tools that you can use to install flooring, you should take the following into consideration:
Home use or Professional Use
The purpose of the tool you’ll get also plays a huge role in choosing the right flooring nailer for you. Are you installing wood floors in your own home or are you planning on expanding the services you offer to clients? If you’re just using it at home, you might be able to make concessions and prioritize your budget over other things.
However, if it’s for professional use, you might need to invest more in the unit for convenience and durability. If the nailer you’re shopping for is going to be one of your tools for your trade, you should look for a good one that can guarantee the best results.
Pneumatic vs Manual
This is possibly the biggest decision you need to make when shopping for a flooring nailer. It determines how easy to use, efficient, and affordable the unit you’ll get can be.
As mentioned above, these two types of flooring nailers are quite different from each other. The Manual type is simpler in engineering and doesn’t require any hookups so it’s more affordable. Pneumatic flooring nailers, on the other hand, are easier to use as it requires less effort from users.
These make each of them more appealing to certain folks. For example, pneumatic flooring nailers will prove to be more suitable for those who will regularly use it. This makes it a good pick for professional jobs or a large home job.
Manual nail guns, on the other hand, still require manual labor so they might not exactly be the best options for everyday use. It’s up to you, really, which one to choose as these two items suit different needs and preferences.
Flooring Nailers vs Flooring Staple Guns
The other thing that you should decide on is whether to actually go for a flooring nailer or a stapler. These two have their own pros and cons, so it’s best to weigh your options.
Again, as mentioned above, nail fasteners provide firm hold but are still capable of adjusting to the expansion and contraction of the wood. Staplers offer firmer initial hold but are not flexible enough to allow the movements of the wood.
Learn More about Flooring nail guns vs roofing nail guns.
This causes them to dislodge after a while which can lead to your floor creaking. In some occasions, it can also cause the boards to split due to its firm hold. This can be another serious issue that you’ll want to avoid altogether. So, with these, you might really be better off with a flooring nailer than a staple gun. However, again, it’s still up to you to decide which one feels like a better match for your needs.
Cleats or Staples
Deciding between cleats or staples usually follows your decision between nail guns and staplers. This means that you might not really need to choose between these two items anymore if you were able to take a pick between the two tools above.
However, it’s still worth mentioning because staples are cheaper than cleats. The latter can be twice the cost of the former, so some people tend to hesitate because of this fact. If you’ll look at their performance, however, you’ll get your money’s worth with cleats.
Choosing the type of cleats to use, however, is something you might need to think about. These fasteners are divided into two types: L-shaped and T-shaped. They’re not functionally different but every flooring nailer has its own requirements. So it’s important to check what kind of cleats your preferred model use.
If you don’t want to take a pick between these options, you can also look for a flooring nailer that can use both cleats and staples. There are quite a few options available and they’re often recommended for professional use. Check them out as they might also be the most convenient option for you.
Power Source
Choosing a flooring nailer based on the power source is also all about choosing between pneumatic or manual varieties. The pneumatic variety is actually the only powered type between the two, so it’s really the only option you have if you prefer such.
Due to its power source, however, these flooring nail guns aren’t the most portable options out there. You’ll need to lug around an air compressor, cables, and a hose to use this tool. So while it can be more convenient in terms of driving cleats into your floors, it’s not an ideal choice if you need something portable.
For this very reason, the manual type continues to be a popular pick even if it is a bit more difficult to use. Since you don’t need to hook it up to anything, you just really need the tool, a good number of cleats, and a mallet to get to work.
Performance in Tight Spots
You’ll need to cover entire spaces with your chosen flooring material to get the best results. To do this, you have to make sure that your flooring nailer can handle tight spaces as well. To ensure that your nailer will fit in tight areas, be very particular with the size of the nail cartridge of the item you’re eyeing. The larger they are, the harder they’ll fit in tight spaces. It might feel convenient to be able to load lots of fasteners but if you’ll achieve this benefit by not being able to fit in small areas, you’re better off reloading more often.
Depth Control
Wood floorboards come in different thicknesses so you will also need to drive your cleats and staples at varying depths. A good and versatile flooring nailer will let you adjust the depth of the nailer’s drive. Some tools do not have depth adjustment at all while others will require you to manually adjust the depth settings. While this procedure isn’t exactly difficult, it can still be fussy. Fortunately, there are some units that are designed for tool-free adjustments. Those can be the easiest to work with, so make sure to look for some.
Weight
You’ll need to carry the flooring nailer in order to use it. This is why lightweight units are attractive options as they’re less likely to tire you out before you finish installing wood floors in a small room. When considering this factor, however, you shouldn’t just go for the lightest item you find.
As the weight can be indicative of the materials used, you should make sure first that the item you’re eyeing is made of quality materials. If it’s too light, it might be made of flimsy steel. This can also affect the performance and safety of the unit, so you might want to avoid anything of the sort. The ones that are made of solid steel and is a bit on the heavy side might better guarantee quality and performance, on the other hand.
Accessories
Aside from the mallet, there are other essential accessories that you’ll need to make the most out of your flooring nailer. This is why some products also include items like replaceable base plates, adjusting wrenches, carrying cases, lubricating oils, and compressor hose fittings (in the case of pneumatic nail guns).
Brands
When it comes to power tools, the brand says a lot about the product. Some brands are definitely more reliable than others, so it’s crucial that you opt for them over than others. In many cases, they can guarantee the best results.
Read different nail guns brands reviews
Aside from their performance and reliability, a brand’s customer service is also worth taking into consideration. Since power tools are purchased to be used for a very long time, you might find yourself in need of assistance at some point. So make sure to also check what a brand’s after-sales services are like before making a call.
Dry Firing Lockout
Sometimes, flooring nailers jam because the last remaining cleats or staples get stuck inside. This can be a problem in many ways. Not only will it halt your process but it can also put you in danger. As people in woodworking are the usual victims of nail gun-related accidents, it’s ideal to ensure the safety of the tool that you’re going to use.
This feature will prevent cleats or staples from getting dispensed if there are only a few of them left in the magazine. It can also help avoid creating a sub-standard result that will result from you settling with fewer cleats because you don’t have enough of them inside the magazine anymore.
Warranty
To ensure the quality and durability of the unit you’re eyeing, take a look at the duration of its warranty. Usually, the ones with better warranties last longer. Opt for them as they can be the best options out there.
How to Use a Flooring Nailer
If you don’t know how to use a flooring nailer yet, here are the steps you should do:
1. Install the first few and last rows of the floorboards manually first.
As the flooring nailer will not fit too close to the wall, you’ll need to manually do the first and last rows before using your tool.
2. Read the manual first.
Just like with any other tool or product, you should make sure to read the manual of your flooring nailer before you do anything with it. This will help ensure that you will not use it incorrectly. This can also guarantee your safety as these tools are no joking matters.
3. Measure the height of the wood you’re installing.
Using a tape measure, get the height of the wood boards you’ll install on your floors.
4. Adjust the depth control or attach the correct adapter plate based on your measurements.
Adjust the depth settings of your flooring nailer to ensure that you can use it to install your wood flooring materials to your subfloor.
5. Set up the air compressor if you’re using a pneumatic flooring nailer.
Attach the compressor securely to the tool then set up the compressor to your needed settings.
6. Start using the flooring nail gun.
Here are the steps in using flooring nailers:
- Place the adapter foot snugly against the tongue of the board.
- Strike the ram head of the flooring nailer using the mallet that comes with the tool.
- Move the tool to your next desired spot then repeat from A.
- When moving to the next strip, tap the board firmly so it fits tightly to the first strip.
- Repeat from A until you’ve reached the other end of the room and installed all of your floorboards.
Safety Instructions for Using Flooring Nail Guns
As mentioned above, nail guns, in general, come with risks. So to help you avoid these, here are some safety instructions that you should keep in mind:
1. Wear protective eyewear.
Even if you’re installing floors and your eyes are quite far away, flying debris can still get into your eyes. To protect your eyesight from getting damaged, you should wear protective eye gear. Some flooring nailers come with accessories of this sort so you might not even need to buy any.
2. Inspect the nailer before loading.
You should always check the unit before using it. Even the pneumatic ones, you should check whether it’s in working condition before you load it with cleats or staples.
3. Only use the right fasteners.
Do not use fasteners that are not meant to be used on your unit. Doing so prevents the tool from working incorrectly and causing an injury.
4. For pneumatic nailers, always remove the compressor hose when reloading.
To make sure that the nailer won’t dispense cleats or staples while you’re reloading it, remove the compressor hose first.
How to Install Hardwood Floor
Whichever tool may it be that you ended up choosing, the basic steps of installing hardwood floors remain the same. Here are the fundamentals of the said process:
1. Prepare the sub-flooring.
You need your sub-flooring to be in perfect shape if you don’t want to have any issues with the flooring that you’ll install. This step comes with smaller sub-steps which are the following:
- Ensure that the sub-floor is flat and level. If it’s uneven, joisting might be necessary.
- Sweep or vacuum and thoroughly clean the sub-floor. This will further ensure that the surface is level and flat.
- Stick a roll of vapor barrier paper on your sub-floor. This will help keep your wooden materials stay intact and in great shape.
While prepping the sub-flooring, you also might want to acclimate the floorboards you’ll install in the same room they’ll go in. leave it inside the room for at least 2 days so they’ll really get used to the conditions of the space.
2. Map out your installation process.
Select which wall you’ll start with. Experts recommend that you start with the longest unobstructed wall so you’ll get a seamless finish. Proceed to remove shoe molding next.
3. Start installing your flooring.
Here are the steps you should take to install wood floors:
- Using a piece of chalk, mark a line ⅜” away from the baseboard. This will be your starting point as your wood floorboards need some extra room for the inevitable expansion.
- Manually install the first two rows of your flooring. Using a hammer, nail down the first rows of your flooring. Countersink the nails using a nail punch then fill the remaining holes with putty.
- On the second row, secure the boards by locking the tongue and groove. Tap them together using a mallet.
- Nail down the boards using your nailer or stapler. Use your tool accordingly.
- Repeat until your tool can’t fit between the boards and the wall anymore.
- Switch back to hand-nailing for the remaining rows. You’ll also most likely need to cut the boards to fit the remaining space. Don’t forget to leave an expansion gap of ⅜” again. G. Install the transition pieces according to manufacturer instructions.
FAQs
- What kind of nailer do you use for hardwood flooring?
Ans: To get the maximum result you need to use a quality pneumatic flooring nailer for your hardwood floor.
- What is better staples or nails for hardwood flooring?
Ans: Nails are better for hardwood flooring as staples usually damage the floor more often than nails though staples are popular among some users.
- Can you use a brad nailer for hardwood floors?
Ans: For any type of floor, your first priority should be a flooring nail gun. But you can use a brad nailer too if you can maintain the correct angle and nails properly which is not very easy always.
- How many types of fasteners can be used for flooring?
Ans: There are basically two types of fasteners can be used. Those are Cleats and Staples. You can learn about Cleats vs Staples here.
Conclusion
Replacing your old floors with new wooden ones may seem like a daunting task at first. However, as this guide may have clued you in with, the right flooring nailer from different types of nail guns can make it a more manageable and easier chore to complete.
Planning to replace your old flooring with hardwood on your own? You can certainly opt to do it with manual tools but do you really have the time and energy to do that? You’re better off with a tool like the best flooring nailer, as they can make the process a lot simpler for you.
While this tool won’t necessarily eliminate the hard work required to nail wood down, it still requires a lot less effort to work with. This makes it a handy tool to have for such a strenuous task.
Like any other tool out there, though, not all nailers for flooring are made equally. So you need the best one to ensure efficiency and good results. To help you find the best flooring nailer out there, check out our guide below.
In a Hurry? Check The Done For You Suggestions For Best Flooring Nailers
Table could not be displayed.Best Manual Flooring Nailers: 16 Gauge
Pneumatic flooring nail guns maybe more convenient picks but manual ones can also be ideal choices for a lot of households. Their price and functionality are hard to beat, so why not give them a shot?
If you’re thinking of getting one, here are two of the top picks that you can opt for :
1. Porta-Nails 402A Manual Flooring Nailer Review
The Porta-Nails 402-A Manual Nailer is a popular pick by many homeowners and professionals because of its handy design. While manual nailers are notoriously known for being tedious to use, this product addressed the most common complaints to make sure that this product is easier to use than its competitors.
No products found.
What makes it different is its ram head. It’s designed not to return until the nail is properly seated. This gives you a good indication that you don’t need additional strikes and that you can already move to the next spot. If you’re worried about speed and efficiency, this product can still be a solid choice for you.
It also only needs one or two strikes to achieve perfect seating. This means that you don’t really have to exert a lot of effort to use this tool. As a bonus, you’ll also get quite a few additional accessories with this Porta-Nails product. Each unit comes with a mallet, a carrying case, extension handle, wrenches, and an angled shoe for 5/8 in. to 3/32 in. tongue and groove flooring.
2. BOSTITCH MFN-201 Manual Flooring Cleat Nailer Review
Another beautiful option is the Bostitch MFN-201 Manual Cleat Nailer. This product comes in bright yellow coloring which is quite common among power tools. Even though this is a manual unit, this appearance makes it easier to find in your storage.
No products found.
Why choose this product? One of its strongest suits is its Ratcheting Drive Mode which you can switch to if you need to hit the ram head again after failing to dispense the nail to the floor on your first go. This will allow you to ensure that you’ll do a great job of installing floors. The inclusions of this product are also worth noting. Each purchase comes with a mallet, hex wrenches, flooring adaptors, and a carrying case.
10 Best Pneumatic Flooring Nailers for Hardwood
To ensure that you’ll do a thorough job in finding the right tool for the hardwood installation task you’re planning to do, we rounded up some of the best pneumatic flooring nailers and flooring staplers that you can consider for the job.
Pneumatic flooring nailers are more commonly recommended by experts because of its ease of use. So if you’re willing to invest in a good unit, here are a few options that you should check out.
1. NuMax SFL618 Review
Starting our list is the NuMax SFL618. There are tons of great things this product can offer and at the top of this list is its versatility. It can work with T-cleats, L-cleats, and even staples so it guarantees wide functionality.
No products found.
f you’re worried about the clunkiness of floor nailers, you don’t have to worry about it with the NuMax sfl618 It’s ergonomic design guarantees that it’s easy to work with. It also comes with a rubber grip so you can be comfortable while working with it. And since it doesn’t weigh much, thanks to its cast die lightweight aluminum and heat-treated steel construction, you don’t need to fret about its handling.
It has a magazine capacity of 90 – 120 Staples and runs on 120/115 psi. As a plus, this model has also been upgraded recently with smaller body design. This makes it even easier to work with, making it perfect for professionals and DIYers alike.
2. Freeman PFL618BR Review
The Freeman PFL618BR is another reliable option for anyone who is after the best pneumatic flooring nail gun for hardwood. Its strongest suit? Its 7-year limited warranty. With this, you’re guaranteed that it will last a long while and that the manufacturer stands behind the quality of their product.
No products found.
Aside from its quality and durability, this product also promises great versatility. Like the NuMax product mentioned above, it’s also a 3-in-1 floor nailer and can handle T-cleats, L-cleats, and regular crown staples. Its design is meant to give you more freedom in choosing the materials that your unit can work with. It also has interchangeable base plates which makes it easy to work with different floors with different thicknesses.
Another advantage of using this is its long handle by which you can reach far. Ease of use is also something you can expect from the Freeman PFL618BR. Its ergonomically designed handle makes it very easy and less tiring to work with even on long shifts.
It also has a semi-quick release so you can easily fix jams. And since it is a pneumatic flooring nailer, it’s already easier to use than manual varieties. With these, you can be sure that this tool will help you get a big job done without too much fuss.
3. Freeman PFBC940 Review
Those who prefer the look of flooring staplers but are more convinced with the efficiency of nailers should check out the Freeman PFBC940. This is both a flooring stapler and a nail gun all rolled into one. In terms of design, it looks exactly like a flooring stapler but as it can also handle cleats, it’s also classified as a nailer.
No products found.
Further boosting its convenient use are its versatile features. Starting off this long list is its 360-degree adjustable exhaust so you don’t need to worry about debris and oil getting into the surface of your floors.
Next up is tool-free finger depth adjustment so you don’t have to fuss with other tools just to tweak its dispensing angle. And since it is designed like a flooring stapler, you can be sure that it’s very easy to maneuver. You don’t even have to worry about having to wield tools on both hands as it’s not necessary with this product.
4. Ramsond RMM4 Review
From a brand known for high-quality products, the Ramsond RMM4 is another solid option for those who are looking for a versatile flooring nail gun. This model can use both crown staplers and L-cleat nails without having to switch magazines. As a result, it’s way easier to operate and utilize for various applications.
No products found.
True to the legacy of the brand, it’s also very durable. This product is primarily made from heavy-duty heat-treated and hardened steel, so you can be guaranteed that it’s nicely constructed and durably built. But what really makes it stand out is its design.
Unlike most other flooring nailers available today, this one is designed to work as close as possible to the wall. The base plate is specially designed so it can allow you to drive fasteners on the floorboards as near as possible to the wall without damaging and marring the walls.
5. Freeman PF18GLCN Review
If you’re thinking of installing exotic and other more expensive types of hardwood, the Freeman PF18GLCN might do the trick for you. It’s a great combination of tough and cautious at the same time, making it the perfect choice for some folks.
No products found.
What makes it tough is its ability to handle hardwood. It’s meant to be used with 18-gauge L-cleats, making it safe and effective for various types of wood. It’s perfect for the denser types like Brazilian teak, strand woven bamboo, and engineered flooring as well as other exotic varieties of wood.
On the other hand, it also handles fancy flooring materials delicately. With its no-mar foot, you don’t have to worry about inadvertently scratching and damaging the surface of your floors as you install them. Another interesting thing about this product is that it comes with a fiberglass no-mar mallet. They’re more durable and comfortable to use, so they also add charm to this entire package.
6. DEWALT DWFP12569 Review
Even those who are not well-versed with power tool makers will recognize the brand the Dewalt DWFP12569 is from. It’s considered an iconic brand that is known not just by the experts and enthusiasts but by the general public as well.
No products found.
What makes this product a hit, you might be wondering? Its strongest suit is most likely its lightweight. It only weighs 10.2 lbs so if you’re installing flooring in a large room, this tool can help you stave off fatigue.
Also known as the 2in1 Flooring Tool, this product will also let you use both L-cleats and staples when installing floors. So if you feel like changing things up, you don’t have to worry about having to switch tools anymore. Another major draw this product has is its lower CFM requirements. It only needs 70 to 100 PSI to work its magic so you can also benefit from less compressor runtime.
7. BOSTITCH MIIIFN Review
Want to make sure to get the quality tool out there? Take a look at the Bostitch MIIIFN, then. As this product is made in the USA, it can definitely guarantee that it’s constructed and built better than most of its competitors.
Further guaranteeing its top-notch quality is the material used for this product. It’s actually made from aircraft-grade aluminum. So if you want to be absolutely certain that you’ll get the best of the best, this product definitely makes a case for itself.
No products found.
But this product is also more than just its durable build. It’s also a very heavy-duty tool that offers high-speed and high-power performance. Aside from delivering cleats at a quick pace, it can also deliver up to 420 inch-pounds of driving power. This makes it efficient and suitable for various types of flooring. The only downside is that it can be quite pricey. If you’re looking into an investment piece, however, this can do the trick. With its great features, it might also be worth every penny.
8. BOSTITCH BTFP12569 Review
Installing floorboards with a flooring nailer can be very tough on your lower back so to make things simpler, you might want something with a higher tool height. For this, the Bostitch BTFP12569 can be an excellent choice for you.
No products found.
With a 22.1 inches height and a long rubber handle, this product is taller than some of its competitors. The added height makes it easier to work with as it won’t require you to crouch down that much. Combined with its 10.2 lb weight, it can easily promise ease of use and maneuvering as well as less fatigue to users.
In terms of performance, this product also delivers wonderfully. It can handle both staplers and L-cleats so it’s highly versatile. It can definitely handle various types of flooring materials. To top it all off, it also comes with a 7-year limited warranty. This further guarantees its top-notch quality and durability.
9. NuMax S50LSDH Review
Another option if you want a nailer for your flooring job that is comfortable to use is the NuMax S50LSDH. It has a unique design that allows it to be used while standing or kneeling so you can choose or switch positions when installing your floorboards.
Aside from having a top handle, the S50LSDH also has another handle positioned at the same level as the ram head. This allows you to either stand or kneel while you work, letting you choose the position you’re most comfortable in.
No products found.
It’s not just its handle design that makes this product worth a shot, though. It’s also very affordably priced so you can opt for it if you’re on a budget. Despite its price, you don’t have to compromise its performance since it also has a wide range of features. For one, it can work with both L-cleats and crown staplers. It also comes with a non-marring base, interchangeable base plates that can further guarantee its versatility.
10. Carpenter Air Tools CFL4518 Review
If fatigue is your number one enemy when installing floorboards, then the Carpenter Air Tools CFL4518 would be a great choice for you. As it only weighs 9.15 lbs, it’s one of the lightest options that you’ll find on this list.
You might be thinking, how is it so light? Is it still durable enough to get the job done with that weight? Fret not because this product can still handle tough jobs without a hitch. It’s made from heavy-duty heat-treated aluminum so its construction is light but also very sturdy and durable.
No products found.
This product also comes with a 7-year limited warranty, so it can further guarantee durability. It has a rubber mallet with it. The white rubber mallet given is made of high-quality material and construction, so you can be sure that it will last. The only thing that some folks may have a qualm with is its magazine design. It’s only meant to be used with 18-gauge L-cleat nails so it tends to have pretty limited compatibility with flooring materials.
5 Best Flooring Staplers Reviews
On the flip side, if you’re more partial towards the handiness of flooring staplers, here are some options for you to choose from.
1. BOSTITCH EHF1838K Review
Made for 18-gauge crown staplers, the Bostitch EHF1838K is one of the handiest and most convenient flooring installation tools in the market today. It’s very easy to use, thanks to its practical design.
No products found.
The main draw of this product is honestly its no-tool adjustment. Instead of using a separate hand tool to adjust its depth drive, it comes with a knob. So if you need to tweak its settings to match the needs of your flooring material, it’s very easy to do. It’s also designed for tool-free jam clearing. This guarantees that you don’t have to fuss too much in the unfortunate event of jams.
2. Bynford Flooring Stapler Review
Looking for a flooring stapler that can handle narrow crown staples? The Bynford Flooring Stapler would be a solid choice for such. But aside from crown staplers, it can also work with brad nailers, expanding the list of items it can work with.
No products found.
As you can also turn it into a conventional staple gun by swapping out its nose plate, you are promised to get a lot more use from this product. These make it all the more versatile and reliable for those who often take on various projects. its unique feature, however, is the design that allows it to staple down floorboards on the groove side. Not a lot of floor nailers and staplers can offer this.
3. 3PLUS HFS509040SP Review
Also known as the 3Plus 4-in-1 Pneumatic 18 Gauge Flooring Stapler/Nailer, the 3Plus HFS509040SP is another versatile option for those who are after a flooring nailer that can handle narrow and thin fasteners..
No products found.
It’s designed to work with 18-gauge brad nails and narrow crown staplers so you can be sure that it’s useful for various applications. Like the Bynford item above, this product is also made for tool-free adjustment. You can tweak its depth drive and clear jams without the need for additional tools.
4. Freeman PDX50C Review
Those who are investing in their flooring materials should also do the same with their installation tools. For this, the Freeman PDX50C promises a good job.
No products found.
Essentially, this product is a flooring nailer because it’s designed like one. However, since it can also handle staples, it can also be considered as a flooring stapler. This gives it versatility, however, and a lot of driving power.
5. 3PLUS HFSNSP Review
Like the Freeman item listed above, the 3Plus HFSNSP is also a flooring nailer and stapler in one. It’s more of the former because of its physical design. However, you can also handle it like a flooring stapler since it comes with a secondary handle. It’s also where the air intake is placed, so it can actually be the better handle among the two available.
No products found.
To make the use of the lower handle more comfortable, you can take off the one placed at the top of the unit. This makes it more maneuverable and less clunky. Both handles are padded, so they’re comfortable to hold on to and work with. Being a flooring stapler and nailer rolled into one, you can use both staples and L-cleat nails with this item.
What is Flooring Nail Gun?
Before we go into detail about the best flooring nailers in the market today, you might need to know about its basics first. What exactly is a flooring nail gun, you might be wondering about that?
Also referred to as a floor nailer or the flooring cleat nailer, this tool is a large tool that dispenses cleats at a 45-degree angle. It’s a relatively large item that is somewhat V-shaped with a handle that extends upwards from one of the inner sides of the ‘V’. Its primary purpose is to help you drive in cleats into the wood and your floor.
Flooring nailers are not electric power guns, it still requires a bit more effort to use. Unlike drills and impact drivers, you’ll need to hit the driver head using a mallet in order to dispense a cleat into the wood. With the angle of the dispenser, this tool is capable of driving the cleat into the wood and floor at a 45-degree angle.
Learn more about some other types of nailing guns
- Palm Nailers Reviews
- 23 Gauge Pin Nailers Reviews
- Best Siding Nailers Reviews
- 8 Best Nailers for Fencing
Commonly confused with flooring staplers, flooring nail guns are definitely different. Flooring staplers provide two-pronged fastening which is stronger than what cleats can offer. However, they do not hold as firmly as cleats do when the woods start to expand or contract. As a result, they cause creaking and splitting.
Types of Flooring Nail Guns and Their Use
Flooring nail guns can be both power and manual tools depending on the type you’ll get. There are two general types of these items which we will discuss in detail below.
Pneumatic Flooring Nailer
As its name would suggest, pneumatic flooring nailers are air-powered tools that will let you use additional force produced by an air compressor to drive in the cleats into the wood and your floor.
Because of this, you need to plug it into an air source instead of an electrical socket. While this can also qualify this product as a power tool, it’s still important to note that you’ll still need to hit the ram or drive head when dispensing cleats into your floors.
Manual Nailer For Flooring
Manually operated flooring nailers, on the other hand, are not designed to be assisted with any additional force to drive in the cleats into the wood and your floor. While they do have springs, you don’t need to hook them up to anything before use.
This type only relies on the physical force you’ll provide when hitting its drive head in order to dispense its cleats and attach wood panels to your floor. When it comes to pricing, pneumatic flooring nailers are more expensive than manual ones. This might also help affect your decision making so it’s important to note.
Buying Guide for a Hardwood Flooring Nailer
As flooring nailers will play the main role in your wood floor installation, it’s just right that you want to know how you can find the best tool for you. In this case, we’ve rounded up some of the most important tips and points to consider to help you narrow down and weigh your options. Check them out below.
Decide What You Need
To help you narrow down the scale of your options, you should first decide exactly what you need in a hardwood floor nailer or flooring staples, if you actually need one at all. Since there are different types of tools that you can use to install flooring, you should take the following into consideration:
Home use or Professional Use
The purpose of the tool you’ll get also plays a huge role in choosing the right flooring nailer for you. Are you installing wood floors in your own home or are you planning on expanding the services you offer to clients? If you’re just using it at home, you might be able to make concessions and prioritize your budget over other things.
However, if it’s for professional use, you might need to invest more in the unit for convenience and durability. If the nailer you’re shopping for is going to be one of your tools for your trade, you should look for a good one that can guarantee the best results.
Pneumatic vs Manual
This is possibly the biggest decision you need to make when shopping for a flooring nailer. It determines how easy to use, efficient, and affordable the unit you’ll get can be.
As mentioned above, these two types of flooring nailers are quite different from each other. The Manual type is simpler in engineering and doesn’t require any hookups so it’s more affordable. Pneumatic flooring nailers, on the other hand, are easier to use as it requires less effort from users.
These make each of them more appealing to certain folks. For example, pneumatic flooring nailers will prove to be more suitable for those who will regularly use it. This makes it a good pick for professional jobs or a large home job.
Manual nail guns, on the other hand, still require manual labor so they might not exactly be the best options for everyday use. It’s up to you, really, which one to choose as these two items suit different needs and preferences.
Flooring Nailers vs Flooring Staple Guns
The other thing that you should decide on is whether to actually go for a flooring nailer or a stapler. These two have their own pros and cons, so it’s best to weigh your options.
Again, as mentioned above, nail fasteners provide firm hold but are still capable of adjusting to the expansion and contraction of the wood. Staplers offer firmer initial hold but are not flexible enough to allow the movements of the wood.
Learn More about Flooring nail guns vs roofing nail guns.
This causes them to dislodge after a while which can lead to your floor creaking. In some occasions, it can also cause the boards to split due to its firm hold. This can be another serious issue that you’ll want to avoid altogether. So, with these, you might really be better off with a flooring nailer than a staple gun. However, again, it’s still up to you to decide which one feels like a better match for your needs.
Cleats or Staples
Deciding between cleats or staples usually follows your decision between nail guns and staplers. This means that you might not really need to choose between these two items anymore if you were able to take a pick between the two tools above.
However, it’s still worth mentioning because staples are cheaper than cleats. The latter can be twice the cost of the former, so some people tend to hesitate because of this fact. If you’ll look at their performance, however, you’ll get your money’s worth with cleats.
Choosing the type of cleats to use, however, is something you might need to think about. These fasteners are divided into two types: L-shaped and T-shaped. They’re not functionally different but every flooring nailer has its own requirements. So it’s important to check what kind of cleats your preferred model use.
If you don’t want to take a pick between these options, you can also look for a flooring nailer that can use both cleats and staples. There are quite a few options available and they’re often recommended for professional use. Check them out as they might also be the most convenient option for you.
Power Source
Choosing a flooring nailer based on the power source is also all about choosing between pneumatic or manual varieties. The pneumatic variety is actually the only powered type between the two, so it’s really the only option you have if you prefer such.
Due to its power source, however, these flooring nail guns aren’t the most portable options out there. You’ll need to lug around an air compressor, cables, and a hose to use this tool. So while it can be more convenient in terms of driving cleats into your floors, it’s not an ideal choice if you need something portable.
For this very reason, the manual type continues to be a popular pick even if it is a bit more difficult to use. Since you don’t need to hook it up to anything, you just really need the tool, a good number of cleats, and a mallet to get to work.
Performance in Tight Spots
You’ll need to cover entire spaces with your chosen flooring material to get the best results. To do this, you have to make sure that your flooring nailer can handle tight spaces as well. To ensure that your nailer will fit in tight areas, be very particular with the size of the nail cartridge of the item you’re eyeing. The larger they are, the harder they’ll fit in tight spaces. It might feel convenient to be able to load lots of fasteners but if you’ll achieve this benefit by not being able to fit in small areas, you’re better off reloading more often.
Depth Control
Wood floorboards come in different thicknesses so you will also need to drive your cleats and staples at varying depths. A good and versatile flooring nailer will let you adjust the depth of the nailer’s drive. Some tools do not have depth adjustment at all while others will require you to manually adjust the depth settings. While this procedure isn’t exactly difficult, it can still be fussy. Fortunately, there are some units that are designed for tool-free adjustments. Those can be the easiest to work with, so make sure to look for some.
Weight
You’ll need to carry the flooring nailer in order to use it. This is why lightweight units are attractive options as they’re less likely to tire you out before you finish installing wood floors in a small room. When considering this factor, however, you shouldn’t just go for the lightest item you find.
As the weight can be indicative of the materials used, you should make sure first that the item you’re eyeing is made of quality materials. If it’s too light, it might be made of flimsy steel. This can also affect the performance and safety of the unit, so you might want to avoid anything of the sort. The ones that are made of solid steel and is a bit on the heavy side might better guarantee quality and performance, on the other hand.
Accessories
Aside from the mallet, there are other essential accessories that you’ll need to make the most out of your flooring nailer. This is why some products also include items like replaceable base plates, adjusting wrenches, carrying cases, lubricating oils, and compressor hose fittings (in the case of pneumatic nail guns).
Brands
When it comes to power tools, the brand says a lot about the product. Some brands are definitely more reliable than others, so it’s crucial that you opt for them over than others. In many cases, they can guarantee the best results.
Read different nail guns brands reviews
Aside from their performance and reliability, a brand’s customer service is also worth taking into consideration. Since power tools are purchased to be used for a very long time, you might find yourself in need of assistance at some point. So make sure to also check what a brand’s after-sales services are like before making a call.
Dry Firing Lockout
Sometimes, flooring nailers jam because the last remaining cleats or staples get stuck inside. This can be a problem in many ways. Not only will it halt your process but it can also put you in danger. As people in woodworking are the usual victims of nail gun-related accidents, it’s ideal to ensure the safety of the tool that you’re going to use.
This feature will prevent cleats or staples from getting dispensed if there are only a few of them left in the magazine. It can also help avoid creating a sub-standard result that will result from you settling with fewer cleats because you don’t have enough of them inside the magazine anymore.
Warranty
To ensure the quality and durability of the unit you’re eyeing, take a look at the duration of its warranty. Usually, the ones with better warranties last longer. Opt for them as they can be the best options out there.
How to Use a Flooring Nailer
If you don’t know how to use a flooring nailer yet, here are the steps you should do:
1. Install the first few and last rows of the floorboards manually first.
As the flooring nailer will not fit too close to the wall, you’ll need to manually do the first and last rows before using your tool.
2. Read the manual first.
Just like with any other tool or product, you should make sure to read the manual of your flooring nailer before you do anything with it. This will help ensure that you will not use it incorrectly. This can also guarantee your safety as these tools are no joking matters.
3. Measure the height of the wood you’re installing.
Using a tape measure, get the height of the wood boards you’ll install on your floors.
4. Adjust the depth control or attach the correct adapter plate based on your measurements.
Adjust the depth settings of your flooring nailer to ensure that you can use it to install your wood flooring materials to your subfloor.
5. Set up the air compressor if you’re using a pneumatic flooring nailer.
Attach the compressor securely to the tool then set up the compressor to your needed settings.
6. Start using the flooring nail gun.
Here are the steps in using flooring nailers:
- Place the adapter foot snugly against the tongue of the board.
- Strike the ram head of the flooring nailer using the mallet that comes with the tool.
- Move the tool to your next desired spot then repeat from A.
- When moving to the next strip, tap the board firmly so it fits tightly to the first strip.
- Repeat from A until you’ve reached the other end of the room and installed all of your floorboards.
Safety Instructions for Using Flooring Nail Guns
As mentioned above, nail guns, in general, come with risks. So to help you avoid these, here are some safety instructions that you should keep in mind:
1. Wear protective eyewear.
Even if you’re installing floors and your eyes are quite far away, flying debris can still get into your eyes. To protect your eyesight from getting damaged, you should wear protective eye gear. Some flooring nailers come with accessories of this sort so you might not even need to buy any.
2. Inspect the nailer before loading.
You should always check the unit before using it. Even the pneumatic ones, you should check whether it’s in working condition before you load it with cleats or staples.
3. Only use the right fasteners.
Do not use fasteners that are not meant to be used on your unit. Doing so prevents the tool from working incorrectly and causing an injury.
4. For pneumatic nailers, always remove the compressor hose when reloading.
To make sure that the nailer won’t dispense cleats or staples while you’re reloading it, remove the compressor hose first.
How to Install Hardwood Floor
Whichever tool may it be that you ended up choosing, the basic steps of installing hardwood floors remain the same. Here are the fundamentals of the said process:
1. Prepare the sub-flooring.
You need your sub-flooring to be in perfect shape if you don’t want to have any issues with the flooring that you’ll install. This step comes with smaller sub-steps which are the following:
- Ensure that the sub-floor is flat and level. If it’s uneven, joisting might be necessary.
- Sweep or vacuum and thoroughly clean the sub-floor. This will further ensure that the surface is level and flat.
- Stick a roll of vapor barrier paper on your sub-floor. This will help keep your wooden materials stay intact and in great shape.
While prepping the sub-flooring, you also might want to acclimate the floorboards you’ll install in the same room they’ll go in. leave it inside the room for at least 2 days so they’ll really get used to the conditions of the space.
2. Map out your installation process.
Select which wall you’ll start with. Experts recommend that you start with the longest unobstructed wall so you’ll get a seamless finish. Proceed to remove shoe molding next.
3. Start installing your flooring.
Here are the steps you should take to install wood floors:
- Using a piece of chalk, mark a line ⅜” away from the baseboard. This will be your starting point as your wood floorboards need some extra room for the inevitable expansion.
- Manually install the first two rows of your flooring. Using a hammer, nail down the first rows of your flooring. Countersink the nails using a nail punch then fill the remaining holes with putty.
- On the second row, secure the boards by locking the tongue and groove. Tap them together using a mallet.
- Nail down the boards using your nailer or stapler. Use your tool accordingly.
- Repeat until your tool can’t fit between the boards and the wall anymore.
- Switch back to hand-nailing for the remaining rows. You’ll also most likely need to cut the boards to fit the remaining space. Don’t forget to leave an expansion gap of ⅜” again. G. Install the transition pieces according to manufacturer instructions.
FAQs
- What kind of nailer do you use for hardwood flooring?
Ans: To get the maximum result you need to use a quality pneumatic flooring nailer for your hardwood floor.
- What is better staples or nails for hardwood flooring?
Ans: Nails are better for hardwood flooring as staples usually damage the floor more often than nails though staples are popular among some users.
- Can you use a brad nailer for hardwood floors?
Ans: For any type of floor, your first priority should be a flooring nail gun. But you can use a brad nailer too if you can maintain the correct angle and nails properly which is not very easy always.
- How many types of fasteners can be used for flooring?
Ans: There are basically two types of fasteners can be used. Those are Cleats and Staples. You can learn about Cleats vs Staples here.
Conclusion
Replacing your old floors with new wooden ones may seem like a daunting task at first. However, as this guide may have clued you in with, the right flooring nailer from different types of nail guns can make it a more manageable and easier chore to complete.